Olof, I think you should remove the version 1.9.0.
Image files cannot be mounted with the control panel. When they are created with a previous version, the drive letter appears as an unknown device. And when the image file is created with the control panel 1.9.0 and then mounted later, the content is corrupted.
I wanted to ask if you find something about the bug of loading the content of an image into virtual memory on Windows XP, but it seems we will wait a bit for that... 
ImDisk 1.9.0: issues with image file mounting
↧
↧
Giveaway of the Day - AOMEI Partition Assistant Pro 5.6 12-16-2014
Giveaway of the Day -
AOMEI Partition Assistant Pro 5.6
http://www.giveawayoftheday.com/aomei-partition-assistant-pro-edition-5-5/
AOMEI Partition Assistant Pro - partition software and disk manager
Key features:
- Change Partition Size: extend, shrink, merge, split partitions, and allocate free space from one partition to another
- Easy Wizards: Extend Partition Wizard, Partition Copy Wizard, Disk Copy Wizard, and Partition Recovery Wizard
- System Migration: migrate your OS from an old HDD to a new SSD or HDD, supporting MBR and GPT disks
- Safe Converters: convert MBR to GPT disk, convert dynamic disk to basic, convert NTFS to FAT32, and convert primary to logical partition
- Windows To Go Creator: build a portable and fully functional Windows 8 system on a USB flash drive
- Make Bootable Disc: create a Windows PE bootable CD/DVD or USB flash drive without installing Windows AIK
Windows To Go Creator
Around 1:47 the video shows how it should work
↧
Multiboot ISO Maker
Hi everyone,
Multiboot ISO Maker (freeware) is an unrestrained graphical front end for mkisofs for Windows and a multiboot ISO creator. It supports all mkisofs options and it is aimed at people who know what mkisofs is and what is not. It is unrestrained because it supports all mkisofs options without any limits and you are not restrained to the bundled version of mkisofs. Multiboot ISO Maker works by placing all mkisofs options in a check list. You can activate and deactivate any mkisofs option by clicking on the item in the list.
Activated mkisofs options are bold so you can distinguish which option is active and which is not. On the right there is a filter box that lets you do a search for mkisofs options in real time. With every option there is associated help text (help text will change) that corresponds to each mkisofs option. The help text appears as a hint/balloon as soon as you hover with mouse over an option. All of options are organized in ascending order.
When you are ready to build the project all you have to do is press the "Build" button on the toolbar. You can also click on the Config File tab to add menu entries to your config file. Multiboot ISO Maker supports multiple projects so you are not restrained to one project. If you've used mkisofs before, you will find Multiboot ISO Maker as a very convenient tool (well I do![;)]() )
)
This is a very early alpha release and although while testing this latest version, I did not find any errors, no software is error free. If you find something wrong, it would not have been done intentionally.
Please do not replace the bundled mkisofs.exe yet. Although it is possible, there are a few gothchas and should there be an error, it would be hard to track down if you replace the bundeled version. For now, for testing purposes please use the one included and then I will give clear instructions how to replace mkisofs.exe with your own version and what you need to do.
Latest release is: Alpha 7:
Screenshot: http://www.techopinion.net/images/alpha7-01.png
Download: http://www.techopinion.net/downloads/mbim_alpha_07_R01.zip
Feedback is welcome![:lol:]()
Multiboot ISO Maker (freeware) is an unrestrained graphical front end for mkisofs for Windows and a multiboot ISO creator. It supports all mkisofs options and it is aimed at people who know what mkisofs is and what is not. It is unrestrained because it supports all mkisofs options without any limits and you are not restrained to the bundled version of mkisofs. Multiboot ISO Maker works by placing all mkisofs options in a check list. You can activate and deactivate any mkisofs option by clicking on the item in the list.
Activated mkisofs options are bold so you can distinguish which option is active and which is not. On the right there is a filter box that lets you do a search for mkisofs options in real time. With every option there is associated help text (help text will change) that corresponds to each mkisofs option. The help text appears as a hint/balloon as soon as you hover with mouse over an option. All of options are organized in ascending order.
When you are ready to build the project all you have to do is press the "Build" button on the toolbar. You can also click on the Config File tab to add menu entries to your config file. Multiboot ISO Maker supports multiple projects so you are not restrained to one project. If you've used mkisofs before, you will find Multiboot ISO Maker as a very convenient tool (well I do
 )
)This is a very early alpha release and although while testing this latest version, I did not find any errors, no software is error free. If you find something wrong, it would not have been done intentionally.
Please do not replace the bundled mkisofs.exe yet. Although it is possible, there are a few gothchas and should there be an error, it would be hard to track down if you replace the bundeled version. For now, for testing purposes please use the one included and then I will give clear instructions how to replace mkisofs.exe with your own version and what you need to do.
Latest release is: Alpha 7:
Screenshot: http://www.techopinion.net/images/alpha7-01.png
Download: http://www.techopinion.net/downloads/mbim_alpha_07_R01.zip
Feedback is welcome

↧
Advanced Network Configurator (Donation Ware)
Advanced Network Configurator is a network IP profile manager allowing you to quickly and easily change your IP settings via a single click. Advanced Network Configurator lets you create different IP profiles with different IP settings. Each network profile consists of an IP Address, Subnet Mask, Gateway Address and DNS records. You can apply a profile by double clicking on it or by simply clicking the "Apply" button. Advanced Network Configurator also lets you back up and restore your entire network configuration and has a built in PING utility. Advanced Network Configurator is aimed at computer professionals, programmers and onsite field engineers whose daily job is troubleshooting, fault finding and monitoring various IP equipment. Advanced Network Configurator also runs in the system tray so you can also apply a profile by right clicking on the system tray icon and selecting the profile. This software is 100% portable.
You can download Advanced Network Configurator from http://neobeta.net/downloads/AdvancedNetworkConfigurator.zip
Screenshots: http://neobeta.net/content/images/anc/official/alpha1/screenshot1.png | http://neobeta.net/content/images/anc/official/alpha1/screenshot2.png and http://neobeta.net/content/images/anc/official/alpha1/screenshot3.png
↧
How to add/integrate 'Wow64' feature within 'Image Index: 2' of 64-bit 'boot.wim' of 'Win8.1U3/Win10' with the help of .cmd and .script files ?
Hello Everyone....
I want to manually add/integrate 'Wow64' feature within 'Image Index: 2' of 64-bit 'boot.wim' of 'Win8.1U3/Win10' with the help of .cmd and .script files.
I want to first extract all required 'Wow64' files (embedded in '5-Wow64.script') within from 'Source' directory to 'Wow64' directory.
\Wow64\Windows\SysWow64
\Wow64\Windows\WinSxS\Manifests
\Wow64\Windows\WinSxS
\Mount_Boot_Index.cmd
\Wow64.script
I will use following variables within 'wow64.script' -
//WinNT6 and WinNT10 Variables
%Wow%=%~dp0\Wow64\Windows\SysWow64
%tWow%=%SystemDrive%\mount4\Windows\SysWow64
%Manif%=%~dp0\Wow64\Windows\WinSxS\Manifests
%tManif%=%SystemDrive%\mount4\Windows\Winsxs\Manifests
%SXS%=%~dp0\Wow64\Windows\WinSxS
%tSXS%=%SystemDrive%\mount4\Windows\Winsxs
CopySysWoW=Run,%ScriptFile%,Process-CopySysWoW
//
And then 'Mount_Boot_Index.cmd' will run 'Wow64.script' in order to add 'Wow64' feature within mounted 'boot.wim'.
These are all things which I plan to do till now. I need support and guidance of related experts. So PLEASE suggest me a better way to achieve my goal.....
---------------------------------------------------------------------------------------------------------------------------------------
Till now, I have found following thread which I think may be useful for extracting All files encoded in .script
wbzip_new.zip
unwbzip006.zip
AFAIU, 'unwbzip.cmd' is a simple batch to help in using 'wbzip_new.exe' to extract files embedded in Winbuilder .scripts.
Usage:
unwbzip <scriptname.script> [options] [<section> <filename>] [TargetDir]
Options:
/L - List all filenames of files encoded in .script
/LS - List all Sections of files encoded in .script
/XA - eXtract All files encoded in .script
I want to create 'Wow64.zip' which will contain all needed files inside '5-Wow64.script' for 64-bit Win8.1U3/Win10.
Can 'wbzip_new.zip' and 'unwbzip006.zip' do something for me ?
I could not understood how to use these files in order to extract all files embedded in '5-Wow64.script'.
Can anybody please help me in creating required bare minimum 'Wow64.zip' for both WinNT6 and WinNT10 ?
How to run 'Wow64.script' file within from a .cmd file in order to add 'Wow64' feature within 'boot.wim' mounted folder ?
Thanks in Advance.....
Regards....
↧
↧
vMount
File Submitter: erwan.l
File Submitted: 10 Mar 2014
File Updated: 04 Sep 2014
File Category: Tools
A command line tool to handle VHD files.
Goal is to facilitate batches around VHD operations.
The tool uses MS Virtual Disk API (only under Windows 7).
The tool can also mount ISO files under Windows 8.
Command line is as follows :
vmount createfixed path size(MB)
vmount createdynamic path size(MB)
vmount createchild path parent
vmount attach path
vmount detach \\.\PhysicalDriveX (x32 version does not work here under x64)
vmount detach path_to_vhd
vmount expand path size(MB)
vmount merge path
vmount disks [filter]
vmount partitions [filter]
vmount mount x: \device\harddiskX\partitionX
vmount umount letter
Feedback / Requests appreciated.
Regards,
Erwan
Click here to download this file
↧
Win7+WinXP+CrunchBang+GParted Live+Memtest86 on USB
New here, I had a few isos laying around and I thought I could place them all on a pendrive and be able to boot into them and install whatever I need on a PC that doesn't have any optical drives on it.
Is it possible to do that from Linux? I don't have any Windows version installed.
I tried this guide, but grub wouldn't install properly on FAT32 here, so it wouldn't boot. Also tried this guide, but for some reason it says "Cannot find the file specified" or a similar error during boot when selecting Windows 7 (haven't tried it with WindowsXP iso yet as I don't know what arguments to add. After pressing enter, I get kicked back to the grub menu Strangely with the latter method GParted live boots with the specified arguments added to the menuentry, but also get the same error as above, just that when I press enter, it boots into the live session.
↧
Error with 64GB USB stick exFAT format
I've been using a 32GB USB stick for Win7PESE and Win8PESE and other ISOs like Acronis TrueImage for multi-boot purpose.
Recently I bought a new 64GB USB stick , and do the same procedure as 32GB USB stick. When I boot Acronis TrueImage , an error with :
Starting Acronis TrueImage ...
It hang up at the above message.
USB64 GB is quite different from USB 32GB stick. The 32GB USB stick default is Fat32, the 64GB USB stick default is exFAT format. Nomatter I format this 64GB USB stick to exFAT, NTFS or Fat32 format. The result is hang up when starting an application or boot up with a blinking cursor only.
This is the first time I use exFAT 64GB USB stick. Any suggestion ? Thanks a lot.
↧
Boot to an x86 OS X Installer (e.g. Yosemite) from grub4dos
I recently discovered that the HFS filesystem is quite easy to boot to from grub4dos, just by using chainloader.
You can make an image of an HFS partition using RMPrepUSB - Drive -> File.
To see how you can make a Yosemite OS X installer image which you can boot to via grub4dos, see my blog post here.
A simplified menu is:
title OS X Installer\n Boot from a partition image\n This uses partition 3 of the USB drive
set HFS=/OSX_Installer.HFSPTN

set E2BDEV=hd0
#enable parttype output
debug 1
parttype (%E2BDEV%,2) | set check=
debug off
set check=%check:~-5,4%
# make empty table entry in 3rd position in ptn table
if "%check%"=="0x00" partnew (%E2BDEV%,2) 0 0 0
echo
if /i "%check%"=="0xAF" echo WARNING: MBR PARTITION 3 IS IN USE (Type AF = HFS partition)
set ask=
if /i "%check%"=="0xAF" echo && set /p ask=OK to delete the HFS partition 3 IN MBR? (Y/[N]) :
echo
echo
# if answer Y, make empty table entry in 3rd position in ptn table
if /i "%ask%"=="Y" partnew (%E2BDEV%,2) 0 0 0
debug 1
parttype (%E2BDEV%,2) | set check=
debug off
set check=%check:~-5,4%
if not "%check%"=="0x00" echo ERROR: MBR PARTITION 3 (%check%) IS ALREADY IN USE - cannot continue! && pause && configfile /menu.lst
errorcheck off
if "%check%"=="0x00" partnew (%E2BDEV%,2) 0xAF %HFS% || echo && echo -e ERROR: %HFS% is not contiguous or is BAD!\nPlease fix using RMPrepUSB-CTRL+F2. && pause Press a key... && configfile /menu.lst
rootnoverify (%E2BDEV%,2) > nul
chainloader (%E2BDEV%,2)+1 > nul
boot
↧
↧
Grub4dos backup cat
Hi there,I cant remember the right command.I want to backup the 1st sector of (fd1) to a file in Grub4dos using cat not dd. Trying something likecat (fd1)+1 > /fileonly shows the 1st line. Using --hex ok, but thats not what I want.Also trying --skip and --length.What is the trick?thanks
↧
ZeeMouse v1.7 allows you to use your wireless bluetooth game controller
ZeeMouse v1.7 allows you to use your wireless bluetooth game controller
example: Moga Pro Controller on Windows
http://www.bitbanksoftware.com/tinytools.html
ZeeMouse v1.7 allows you to use your wireless bluetooth game controller (Zeemote JS1, SteelSeries Free, BGP-100, iControlPad, all PowerA MOGA controllers ** NEW **) as a mouse or gamepad on your PC. Pair (but don't connect) your device with your PC before running ZeeMouse.
Latest changes: added support for the trigger buttons of the Moga Pro and support for the Hero and Pro Power devices.
How to connect your moga to your pc
for windows phone
SmartGear Free app for android from developer of ZeeMouse
Description** NEW ** added support for PowerA MOGA Hero, Pro and Pro Power controllers
SmartGear is a multi-system classic game emulator. It contains code to emulate the hardware of classic game systems so that the original game code can run unmodified on different hardware. This allows you to play games from a wide variety of systems on your phone, tablet or PC. It includes code to directly communicate with many wireless bluetooth game controllers. The advantage of having built-in code is that it reduces lag/latency of responses and allows two-player simultaneous play. SmartGear currently supports games designed for the GameBoy, GameGear, Sega Master System, NES (Famicom), Genesis (MegaDrive), Turbografx-16, and various coin-operated games. The games are accessed as ZIP files containing “rom dumps” from the original game cartridges. SmartGear does not contain any copyrighted game code. Do not ask BitBank Software for access to these games, we cannot provide them. It is up to the user to have the appropriate access and rights to use the original game code.Features:
1) Previously played games gallery for quick access to your favorites
2) Supports GameShark and GameGenie cheats
3) Direct support of Wiimote, MOGA, Zeemote, SteelSeries Free, BGP-100, and iControlPad. Low latency, Supports 2-player simultaneous play.
4) Pre-defined keys for Xperia Play, iCade, iMpulse, Gamestop controller
5) Customize key codes for any input device
6) Turbo mode allows 2-16x advance through (boring) intros (not on the free version)
7) Load/Save and auto-load of games (not on the free version)
8) Includes smart stretching algorithm to make low-res games look good on hi-res displays
9) Allows head-2-head play of GameBoy and GameGear games on a single device (simulates link cable)
10) Rewind gameplay 4 seconds in case of a "fatal" error
11) Save a screenshot as a PNG file
12) Pauses the game properly when the focus is lost or a menu is opened
13) Renders in OpenGL at 60fps (as long as your machine can handle it)
14) Optionally drive the GUI from the wireless controller (e.g. open, start, quit, etc)
15) Programmable shoulder button actions during gameplay (e.g. pause, rewind, save, etc).
↧
OEM Product Activation - Clearing the Crapware!
I have a tendency to go on a bit so I'll do my best to clarify what this post is about before you become so bored you stop reading. Basically it will cover extracting OEM licensing information prior to installing a clean (non cr@pware) version of Windows 7 (and probably Vista/2008), then (re)activating using the OEM information extracted earlier. It won't work for everyone as it depends on the method your OEM uses to activate your system. Provided your BIOS contains the relevant information it's possible to extract an OEM certificate from your existing system so that it can be added to a new retail installation to convert it back to OEM - activating windows. You will need to provide your own installation media.
See here for an interesting article on the subject of cr@pware. According to the author "...The weakest link in the PC ecosystem is, without a doubt, the one right before the hardware reaches your desk...".
Before proceeding it's worth discussing Microsoft Product Activation. See here for an article on Technical Details on Microsoft Product Activation for Windows XP - it's well worth reading and much of it also applies to Windows 7. Some gems from this article -
The method below has been tested with Windows 7 but should also apply to Windows Vista/2008, as these products all use similar OEM product activation. I have not been able to test this method with Vista or 2008 due to hardware (and software) restrictions - my Samsung NC10 netbook runs Windows 7 fine, but will not work with Vista and I don't have a copy of Windows 2008 to test.
This topic might fall into grey areas in terms of legalities. I would like to make it clear that although some of the information can potentially be abused to help circumvent Windows product activation, I am not advocating any form of piracy.
During the past few years I have noticed an increase in the amount of cr@p that OEM's bundle with new computers. Some of these systems are, to me, almost unusable as a consequence. My first task on purchasing any computer is to remove all of the cr@pware so that I have a clean working system. Some people use the Add/Remove Program features of Windows to complete this task, however in my experience uninstalling a program does not always remove all trace of it. It can also take longer to remove bundled software than to do a clean Windows installation - try uninstalling a Microsoft Office Suite trial for fun!
I prefer a more drastic approach, but like to retain the benefits of OEM product activation. The method I will detail in this post will only work if your computer users the System Locked Pre-installation (SLP) method of activation. A SLP BIOS contains information that is used to automatically activate Windows so that online (or telephone) product activation is not required. I have no intention of discussing how to add this information to a BIOS that does not already contain it - any requests regarding this will be ignored and hopefully deleted. If you purchased your computer from a major OEM (including Acer, Asus, Dell, HP, Samsung, Sony, etc) then there is a very good chance that it uses a form of SLP - whether this be version 1.0 (Windows XP/2003), 2.0 (Vista/Server 2008) or 2.1 (7/Server 2008 R2 - backwards compatible with Vista/Server 2008).
SLP 2.* activation requires three separate components -
The Product Key on the Certificate of Authenticity (COA) attached to an OEM system is not necessarily the key used to activate the computer if SLP activation is used. To find the SLP Product Key, use a keyfinder (e.g. Magical Jellybean, System Information Windows, etc).
To obtain the OEM certificate extract it using a hex editor (see below). These steps must be completed before installing your clean version of Windows.
I recommend that you take a backup of your system before attempting this tutorial. I'd hate for you to go through these steps to find that your system doesn't actually use SLP activation - having already wiped your working (activated) OEM installation. There are loads of system backup methods including paid and freeware - e.g. Ghost, DriveimageXML, Drive Snapshot. See Jamal's Image your System and Forget about Formatting – Period! for one method of backing up the system.
Checking the BIOS for SLIC information
AIDA64 can be used to check if your BIOS contains SLIC information - download from here. The limited functionality trial version can be used. Start AIDA64 and check Motherboard > ACPI > SLIC to see if a SLIC description table is present in your BIOS. This will display the SLP version used on your system (e.g. 2.0/2.1).
NOTE - The presence of a SLIC description table does not necessarily mean that your computer uses SLP activation - hence my suggestion to back up your system.
Remember to find your license key
As previously stated, the Product Key on the Certificate of Authenticity (COA) attached to an OEM system is not necessarily the key used to activate the computer if SLP activation is used. To find the SLP Product Key, use a keyfinder (e.g. Magical Jellybean, System Information Windows, etc).
Extrating the OEM Certificate (.xrm-ms)
To extract the Digital OEM Certificate you will need to find tokens.dat - this file should be in the Windows\ServiceProfiles\NetworkService\AppData\Roaming\Microsoft\SoftwareLicensing directory (or possibly the same path but SoftwareProtectionPlatform folder). I usually copy this file using WinPE, however it can be copied from a live system - you will have to ensure that hidden folders are displayed. Copy tokens.dat - e.g. to C:\tokens.dat.
1 - Open C:\tokens.dat in a hex editor - I have used the excellent tinyhexer.
2 - Search for text OEM Certificate (Ctrl+F, select/tick the Find Text and Ignore case boxes and click on Find).
3 - Manually scroll upwards and locate the text <? xml version= " 1.0 " encoding= " utf-8 "? > proceeding the OEM Certificate string located in step 2.
4 - Now manually scroll down and find the text string </r:license> directly following the OEM Certificate string located in step 2.
5 - Now highlight from (and including) <? xml version= " 1.0 " encoding= " utf-8 "? > (step 3) to </r:license> (step 4)
6 - Copy the highlighted text (Edit > Copy)
7 - Paste into a new file (File > New, followed by Edit > Paste)
8 - Now save as oemcert.xrm-ms file (File > Save)
NOTE - I managed to obtain over 40 OEM certificates (via google) to check for a common size. All of the SLP 2.1 certificates I obtained were 2731 bytes in size.
Installing Windows and (Re)activating
This is where things can get a bit controversial, as you will probably require a retail disc to complete the steps below. OEM's rarely provide optical media these days, as recovery partitions are used instead. In the days when OEM's did provide optical media it was rarely a proper Windows disc anyway. If you do not have access to a copy of your edition of Windows you won't be able to proceed. Digital River provide downloads on behalf of Microsoft and are seen as a safe source of Media - don't ask for any direct links here though.
Is it legal to install from a retail disc and then convert to OEM after installation? I'm honestly not sure as there are a lot of myths floating around the net and various interpretations of the EULA. I do know that an OEM license is restricted to the computer that was purchased and is not transferable, however this does not apply here.
I am not going to cover the installation here as there are numerous guides out there.
Once Windows has been installed, use the following batch file (run as admin) to (re)activate using the Extracted OEM Certificate and SLP product key taken from your working OEM system (edit the path to your oemcert.xrm-ms file and change the product key) -
Good luck
Regards
Misty
See here for an interesting article on the subject of cr@pware. According to the author "...The weakest link in the PC ecosystem is, without a doubt, the one right before the hardware reaches your desk...".
Before proceeding it's worth discussing Microsoft Product Activation. See here for an article on Technical Details on Microsoft Product Activation for Windows XP - it's well worth reading and much of it also applies to Windows 7. Some gems from this article -
The majority of customers acquire Windows with the purchase of a new computer, and most new computers pre-loaded with Windows XP will not require activation at all. Microsoft provides OEMs with the ability to "pre-activate" Windows XP in the factory and estimates that upwards of 80% of all new PCs will be delivered to the customer pre-activated.
Some OEMs may protect Windows XP using a mechanism which locks the installation to OEM-specified BIOS information in the PC.
Successfully implemented, SLP uses information stored in an OEM PC's BIOS to protect the installation from casual piracy. No communication by the end customer to Microsoft is required and no hardware hash is created or necessary. At boot, Windows XP compares the PC's BIOS to the SLP information. If it matches, no activation is required.
Every single piece of hardware could be changed on a PC with SLP and no reactivation would be required — even the motherboard could be replaced as long as the replacement motherboard was original equipment manufactured by the OEM and retained the proper BIOS.
The method below has been tested with Windows 7 but should also apply to Windows Vista/2008, as these products all use similar OEM product activation. I have not been able to test this method with Vista or 2008 due to hardware (and software) restrictions - my Samsung NC10 netbook runs Windows 7 fine, but will not work with Vista and I don't have a copy of Windows 2008 to test.
This topic might fall into grey areas in terms of legalities. I would like to make it clear that although some of the information can potentially be abused to help circumvent Windows product activation, I am not advocating any form of piracy.
During the past few years I have noticed an increase in the amount of cr@p that OEM's bundle with new computers. Some of these systems are, to me, almost unusable as a consequence. My first task on purchasing any computer is to remove all of the cr@pware so that I have a clean working system. Some people use the Add/Remove Program features of Windows to complete this task, however in my experience uninstalling a program does not always remove all trace of it. It can also take longer to remove bundled software than to do a clean Windows installation - try uninstalling a Microsoft Office Suite trial for fun!
I prefer a more drastic approach, but like to retain the benefits of OEM product activation. The method I will detail in this post will only work if your computer users the System Locked Pre-installation (SLP) method of activation. A SLP BIOS contains information that is used to automatically activate Windows so that online (or telephone) product activation is not required. I have no intention of discussing how to add this information to a BIOS that does not already contain it - any requests regarding this will be ignored and hopefully deleted. If you purchased your computer from a major OEM (including Acer, Asus, Dell, HP, Samsung, Sony, etc) then there is a very good chance that it uses a form of SLP - whether this be version 1.0 (Windows XP/2003), 2.0 (Vista/Server 2008) or 2.1 (7/Server 2008 R2 - backwards compatible with Vista/Server 2008).
SLP 2.* activation requires three separate components -
- SLIC (Software LICensing) description table in BIOS
- Digital OEM Certificate (*.xrm-ms) - must match information in the SLIC description table
- OEM Product Key
The Product Key on the Certificate of Authenticity (COA) attached to an OEM system is not necessarily the key used to activate the computer if SLP activation is used. To find the SLP Product Key, use a keyfinder (e.g. Magical Jellybean, System Information Windows, etc).
To obtain the OEM certificate extract it using a hex editor (see below). These steps must be completed before installing your clean version of Windows.
I recommend that you take a backup of your system before attempting this tutorial. I'd hate for you to go through these steps to find that your system doesn't actually use SLP activation - having already wiped your working (activated) OEM installation. There are loads of system backup methods including paid and freeware - e.g. Ghost, DriveimageXML, Drive Snapshot. See Jamal's Image your System and Forget about Formatting – Period! for one method of backing up the system.
Checking the BIOS for SLIC information
AIDA64 can be used to check if your BIOS contains SLIC information - download from here. The limited functionality trial version can be used. Start AIDA64 and check Motherboard > ACPI > SLIC to see if a SLIC description table is present in your BIOS. This will display the SLP version used on your system (e.g. 2.0/2.1).
NOTE - The presence of a SLIC description table does not necessarily mean that your computer uses SLP activation - hence my suggestion to back up your system.
Remember to find your license key
As previously stated, the Product Key on the Certificate of Authenticity (COA) attached to an OEM system is not necessarily the key used to activate the computer if SLP activation is used. To find the SLP Product Key, use a keyfinder (e.g. Magical Jellybean, System Information Windows, etc).
Extrating the OEM Certificate (.xrm-ms)
To extract the Digital OEM Certificate you will need to find tokens.dat - this file should be in the Windows\ServiceProfiles\NetworkService\AppData\Roaming\Microsoft\SoftwareLicensing directory (or possibly the same path but SoftwareProtectionPlatform folder). I usually copy this file using WinPE, however it can be copied from a live system - you will have to ensure that hidden folders are displayed. Copy tokens.dat - e.g. to C:\tokens.dat.
1 - Open C:\tokens.dat in a hex editor - I have used the excellent tinyhexer.
2 - Search for text OEM Certificate (Ctrl+F, select/tick the Find Text and Ignore case boxes and click on Find).
3 - Manually scroll upwards and locate the text <? xml version= " 1.0 " encoding= " utf-8 "? > proceeding the OEM Certificate string located in step 2.
4 - Now manually scroll down and find the text string </r:license> directly following the OEM Certificate string located in step 2.
5 - Now highlight from (and including) <? xml version= " 1.0 " encoding= " utf-8 "? > (step 3) to </r:license> (step 4)
6 - Copy the highlighted text (Edit > Copy)
7 - Paste into a new file (File > New, followed by Edit > Paste)
8 - Now save as oemcert.xrm-ms file (File > Save)
NOTE - I managed to obtain over 40 OEM certificates (via google) to check for a common size. All of the SLP 2.1 certificates I obtained were 2731 bytes in size.
Installing Windows and (Re)activating
This is where things can get a bit controversial, as you will probably require a retail disc to complete the steps below. OEM's rarely provide optical media these days, as recovery partitions are used instead. In the days when OEM's did provide optical media it was rarely a proper Windows disc anyway. If you do not have access to a copy of your edition of Windows you won't be able to proceed. Digital River provide downloads on behalf of Microsoft and are seen as a safe source of Media - don't ask for any direct links here though.
Is it legal to install from a retail disc and then convert to OEM after installation? I'm honestly not sure as there are a lot of myths floating around the net and various interpretations of the EULA. I do know that an OEM license is restricted to the computer that was purchased and is not transferable, however this does not apply here.
I am not going to cover the installation here as there are numerous guides out there.
Once Windows has been installed, use the following batch file (run as admin) to (re)activate using the Extracted OEM Certificate and SLP product key taken from your working OEM system (edit the path to your oemcert.xrm-ms file and change the product key) -
@ECHO OFF

setlocal


SET CERT=OEM.XRM-MS

SET KEY=#####-#####-#####-#####-#####


:_run

cls

echo.

echo.

echo Select one of the following options -

echo.

echo 1] Activate

echo 2] Check activation status

echo 3] Abort

echo.

set choice=

set /p choice=Type option [1 - 3] and press ENTER.

if '%choice%'=='1' goto _activate

if '%choice%'=='2' goto _check

if '%choice%'=='3' goto _end

goto _run


:_activate

cls

%SYSTEMROOT%\System32\SLMGR.VBS -ilc %CERT%

%SYSTEMROOT%\System32\SLMGR.VBS -ipk %KEY%

goto _end


:_check

cls

%SYSTEMROOT%\System32\SLMGR.VBS -dlv

goto _end


:_end

endlocal

echo.

echo.

pause
Good luck
Regards
Misty
↧
UEFI + GPT + install Windows 7
Greetings folks.
Long post so feel free to skip the intro if you don't have much time to read.
## intro ##
Let me make a small introduction on why/what I am posting here.
My boss just bought me a new laptop that comes with Windows 8.1. It's an Asus X552 which means that unfortunately it's not a business laptop as it was supposed to be. Blame the damned crisis...
Problem is, most of the software that I will be running on it still doesn't run on Windows 8.1 which means that I need to reinstall windows 7 64bits on it.
Since the hdd has little space for my needs, the laptop doesn't come with a dvd reader. Instead it comes with another hdd with a dvd-to-hdd adapter.
This means I need to reinstall using windows 7 USB boot disk because I'm not very familiar with PXE .
## end of intro ##
Problem is, this is my first time with UEFI. I was able to create a windows 7 boot disk using Rufus but then, when Windows is supposed to start copying files to disk, it seems it doesn't recognize my hdd. I know that this may sound a bit vague. If you need the specific error message let me know and I'll try to reinstall and grab a screenshot with a camera.
BTW, since it was making some strange/funny noise, I have removed the hdd and the dvd-to-hdd adapter and I returned it as a DoA.
Someone told me that I could turn the system into a non-UEFI+MBR but I would rather do it properly using UEFI+GPT.
All help will be greatly appreciated.
Cheers
↧
↧
Comment flasher cette clé USB ?
Depuis quelques jours/heures des fichiers sont renommés au hasard avec des caractères très spéciaux qui ne veulent rien dire dans ma clé USB, ça commence à se propager sur plusieurs autre fichiers j'ai soupçonné l'action d'un possible TROJAN.
Seulement, malgré de nombreuses analyses avec de nombreux antivirus, aucune n'a réussi à détecté quoi que ce soit.
Analyse rapide et complète de l'antivirus qui n'a rien détecté.
J'ai formaté plusieurs fois mais le problème est toujours présent
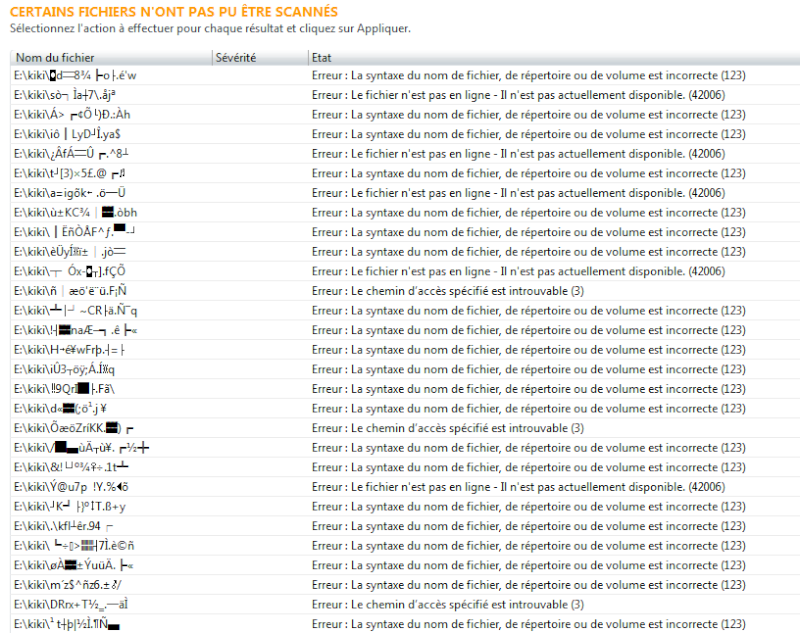
Donc ma dernière solution est de trouver son firmeware pour le flasher.Alors j'ai récupéré les informations de cette clé par le logiciel ChipEasy
Logical drive : I:\ Capacity: 4.0G
Device ID : VID = 0199 PID = 0126
Device SN : 0000000FF5F8FFC3
Device version : 2.40
Device vendor : SAGHI
Device model : Flash
Protocol : USB2.0
Max power : 100mA
Partition type : FAT32 Device active : OK
Aligned state : 1024 KB, Have been Aligned
Controller : Skymedi
Controller model: SK6211/SK6281
Tools : http://www.upan.cc/tools/mass/Skymedi/
OS Version : Windows 7 Professional Service Pack 1
Update Status : The current version is the latest version!
↧
WIN7 Instal from ISO > semi-automatic IMDISK setup
as already described here:
http://www.boot-land.net/forums/index.php?showtopic=10136
hope to give it more visibility ...
I need a batch file!!!![:cheers:]()
![:cheers:]()
this is what I've done:
1) created a WIN7 ISO
2) created an imdisk folder containing the imdisk files, the setupimdisk.cmd and the setupcdrom.cmd
3) mounted rw boot.wim e put the imdisk folder inside the \windows\system32 AND the \sources of the wim, committed changes
4) rebuilded win7 iso containing the modified boot.wim
I've succeded to install win7 using the iso and the imdisk method...wonderful
I'm asking if anyone know how to build a cmd or similar to make automatic the second part of the setup, the one after the international settings.
at the moment, once at the prompt, I must do:
(*) note that the imdisk folder is already present into \sources of the boot.wim
(**) note that at this point I've already copied (at the beginning of the pc's setup) the 7.iso in the root of the first primary partition ntfs formatted-active of the HD0, so the path C:\7iso is correct.
the setupimdisk.cmd:
the setupcdrom.cmd:
I'd like to launch a bat or a cmd or similar, containing all the lines, no needing to type anytithing else inside the prompt.
I know about the installer.cmd > imagexed wim method described here
http://www.boot-land.net/forums/index.php?showtopic=10126
but for some reasons I prefer the ISO way.
Thanks in advance
davide
http://www.boot-land.net/forums/index.php?showtopic=10136
hope to give it more visibility ...
I need a batch file!!!

this is what I've done:
1) created a WIN7 ISO
2) created an imdisk folder containing the imdisk files, the setupimdisk.cmd and the setupcdrom.cmd
3) mounted rw boot.wim e put the imdisk folder inside the \windows\system32 AND the \sources of the wim, committed changes
4) rebuilded win7 iso containing the modified boot.wim
I've succeded to install win7 using the iso and the imdisk method...wonderful
I'm asking if anyone know how to build a cmd or similar to make automatic the second part of the setup, the one after the international settings.
at the moment, once at the prompt, I must do:
pushd imdisk (*)

setupimdisk.cmd

setupcdrom.cmd c:\7.iso (**)

set fullname=c:\7.iso

imdisk -a -f "c:\7.iso" -m #:

x:

setup
(*) note that the imdisk folder is already present into \sources of the boot.wim
(**) note that at this point I've already copied (at the beginning of the pc's setup) the 7.iso in the root of the first primary partition ntfs formatted-active of the HD0, so the path C:\7iso is correct.
the setupimdisk.cmd:
rundll32.exe setupapi.dll,InstallHinfSection DefaultInstall 132 .\imdisk.inf
the setupcdrom.cmd:
Set fullname=%~1

imdisk -a -f "%fullname%" -m #:
I'd like to launch a bat or a cmd or similar, containing all the lines, no needing to type anytithing else inside the prompt.
I know about the installer.cmd > imagexed wim method described here
http://www.boot-land.net/forums/index.php?showtopic=10126
but for some reasons I prefer the ISO way.
Thanks in advance
davide
↧
[Release] ptnfloat.cmd, make your partition entry float to #0
For NO apparent reason ![:dubbio:]() , if not to provide a temporary replacement for plutonium
, if not to provide a temporary replacement for plutonium ![:w00t:]()
![;)]() :
:
http://reboot.pro/topic/20217-how-to-addintegrate-wow64-feature-within-image-index-2-of-64-bit-bootwim-of-win81u3win10-with-the-help-of-cmd-and-script-files/?p=189253
find attached the ptnfloat.cmd, yet another half-@§§ed batch by jaclaz, making use of Olof's rawcopy:
http://www.ltr-data.se/opencode.html/
and (hopefully![:unsure:]() ) working also with it's 64 bit version on 64 bit systems without WOW64 (obviously only briefly tested on 32 bit system - XP SP2 - and COMPLETELY UNLIKE tested on any stupid 64 bit OS).
) working also with it's 64 bit version on 64 bit systems without WOW64 (obviously only briefly tested on 32 bit system - XP SP2 - and COMPLETELY UNLIKE tested on any stupid 64 bit OS).
![:duff:]()
Wonko
 , if not to provide a temporary replacement for plutonium
  :
:http://reboot.pro/topic/20217-how-to-addintegrate-wow64-feature-within-image-index-2-of-64-bit-bootwim-of-win81u3win10-with-the-help-of-cmd-and-script-files/?p=189253
Typical XYZ problem, again.
http://homepage.ntlworld.com./jonathan.deboynepollard/FGA/put-down-the-chocolate-covered-banana.html
You want to swap/reorder partitions?
Good, then ask "How can I swap partitions?", do not ask "How can I gather some plutonium and build an interstellar spacecraft that will allow me to make contact with an alien race that will have the technology to go back in time and swap partitions?"

 , then ask "How can I swap partitions?", do not ask "How can I gather some plutonium and build an interstellar spacecraft that will allow me to make contact with an alien race that will have the technology to go back in time and swap partitions?"
find attached the ptnfloat.cmd, yet another half-@§§ed batch by jaclaz, making use of Olof's rawcopy:
http://www.ltr-data.se/opencode.html/
and (hopefully
) working also with it's 64 bit version on 64 bit systems without WOW64 (obviously only briefly tested on 32 bit system - XP SP2 - and COMPLETELY UNLIKE tested on any stupid 64 bit OS).
Wonko
Attached Files
-
![Attached File]() ptnfloat_001.zip 1.26KB
13 downloads
ptnfloat_001.zip 1.26KB
13 downloads

↧
How to boot MBR of 'found' disk?
I can boot the MBR of a given device:
rootnoverify (hd3)
chainloader (hd3)+1
boot
I can identify a partition on the device I want to boot, and boot from the PBR:
find --set-root /markerfile
chainloader +1
boot
But I would like to, having found the markerfile, boot the MBR, not the PBR.
The best workaround I've thought of is to install Grub4Dos along with the markerfile in that data partition, chain to it, and have it boot the MBR, except that I'm not even sure how to do that ... chainloader (bd)+1 ?
and I'd prefer to minimize changes to the target drive. (ie just add the marker file to a readable data partition).
↧
↧
Can I change system locale???
Hi my friends>>>>
I do win7pe iso that had system locale is en-us.
Can I change that system locale to another language by using mount boot.wim then use any comands in cmd.
↧
Broken links
Since the last crash/update/failed server/whatever links pointing to boot-land.net -like- (example):
http://www.boot-land.net/forums/index.php?showtopic=11442
do not resolve anymore (as they should and did) to:
http://reboot.pro/topic/11442-
these are not so bad as it is trivial (if you know how to do it) to do the conversion:
hxxp://www.boot-land.net/forums/index.php?showtopic=11442
replace the red part above with the red part below, add to it the green number and add to it a dash (or "minus") sign "-"
hxxp://reboot.pro/topic/11442-
The issue comes with links to a post, like:
hxxp://www.boot-land.net/forums/index.php?s=&showtopic=8795&view=findpost&p=85423
that can be translated as follows:
hxxp://reboot.pro/topic/8795-/?p=85423
re-implementing the automatic redirection would be a good thing, of course.
Wonko
↧
Boot from 4K sectors (and, in particular, USB)
For accessing USB mass storage devices, does Grub4DOS have
its own USB software "stack", or does it rely on BIOS support (if any) ?
I guess it uses own stack entirely - and I hope it's the case.
If so, I would suggest a much needed IMO fix/enhancement :
at the moment, Grub4DOS appears not to be able to deal with USB disks that
present 4 K-byte sectors to the host. Could such support be programmed in,
up to and including "BIOS int 13" extension to allow bootstrapping from such
disks' MBR and their legacy OS PBRs ?
[Added:] If OTOH G4D does not include an USB stack at all /yet/, please consider
doing it, including large sectors from the inception !
Are there any alternatives ? (don't say "plop", that does NOT have 4k sector support, but non-working 'experimental')
↧
More Pages to Explore .....


